
So on saturday, Dries came over to my house for a tutorial on using an airbrush for painting models.
I've had my airbrush for about a year now and to tell you the truth, it has been the best hobby-related investment ever. Yes, it requires a non-trivial amount of money to get going, but once you have a setup, things only get better, faster and easier.
First thing I showed him is how to disassemble the airbrush and put it back together... I wish I had someone to show me this when I first started out using an airbrush. The first time I took it apart, I spent an hour trying to put it back together... not because it was that hard to do, but just making sure everything was in the right place and nothing got damaged.

Then came the first reason why every model painter should get an airbrush (imho) and that is the fact that you can prime your models indoors instead of waiting for the rain to stop, grabbing a bunch of models and spray painting them outside, then waiting for an hour to let them dry. With an airbrush, you can just grab even a single model and prime it then and there, waiting maybe 2 minutes for the undercoat to dry and then starting the painting process. Huzzah! Time efficiency.
Oh yeah, I use Vallejo Surface Primer to prime my models. It goes straight from the bottle into the airbrush cup, no thinning needed (a good shaking is mandatory however).
http://www.acrylicosvallejo.com/en_US/primers/family/22
Dries brought two already undercoated space marines, so we started of undercoating some Kroot. I did two as an example, then Dries took over and undercoated the third one. Instantly showing him the merits of undercoating as-you-go.
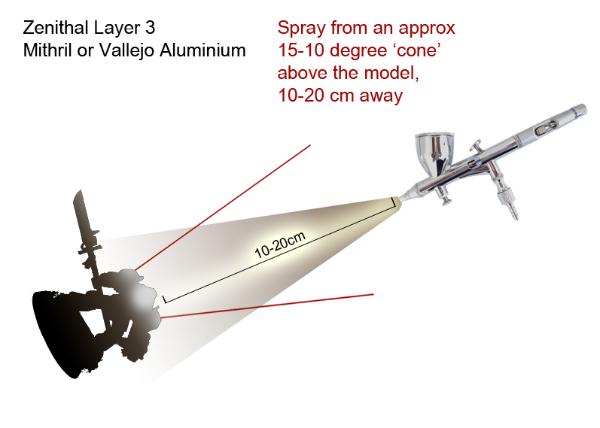
Next step was to apply a zenithal highlight to the marines. This is something an airbrush is really good at. Spraying white paint on a black undercoat from the top of the model gives you the effect of the light shining on the top of the model and the effect gets less and less the more you go down to the base thus giving you a nice natural shading.
We each did one marine, but in our zeal, we actually applied too much paint, so the "shade" near the base wasn't much of a shade. Anyway, this illustrated the technique of zenithal highlighting.
Since Dries' marines may end up being Red Marines, we decided to try airbrushing red. I hadn't done this before and I was afraid the red wouldn't get a decent coverage and/or would clog the nozzle. But surprisingly, the Vallejo Game Color Gory Red and Bloody Red both went through the airbrush and onto the model without a hitch...
We just did the red to show the basecoating and again, zenithal highlighting with a color... no pictures were taken.
Dries was certainly very interested in buying an airbrush setup after my little tutorial.
Are you interested but still need answers to some questions? Hit the comments!
Could you please do this with pics? I'm really curious how the zenithal highlighting actually works out in a step by step manner.
ReplyDeletePretty please :)
Thanks for the request... I'll keep it in mind the next time I crank out my airbrush... applying a zenithal highlight to one (man-sized) model maybe takes 5 minutes, so I can squeeze that in without a problem.
DeleteI was thinking of applying a zenithal highlight to my Riptide, so that might be a nice follow up to the man-sized tutorial.
"Waiting for the rain to stop" - Can you explain how a non-water based paint is affected by the rain or humidity? Unless the rain is falling directly on your models, spray painting outside isn't really affected by rain.
ReplyDeleteI actually meant two things:
Delete1) The actual rain falling on your models ;)
I have space outside to use spray cans, but it doesn't have a roof, so if it rains, my models (and me!) get wet and I can't see that being benificial to your undercoat.
2) The humidity affects the performance of your spray paint. This is of course tied to the actual contents of the specific paint in your spray can. The color may end up being not what you want or the spray might end up in blobs r even streams of paint on your model, which is also not what you want. This is especially true for spray varnish as it has a tendency to turn white instead of transparent when applied in a high humidity environment.
Thanks for the tutorial (both on the blog and IRL :-) ). Getting an airbrush for myself is definitly up high on my priority list now.
ReplyDeleteI wanted to add 2 points re: not having to spraypaint outside.
1) You mentioned humidity/rain, but also frost can have a very negative effect on spraypainting outside, in my experience. So when using cans, I basically can't undercoat during a couple months around january-february :-s
2) If you live in an appartment and don't have an 'outside' then an airbrush setup helps too ;-) (Ok, you can go into the street but then people just look at you funny) This is coming from a guy who had to schedule trips to his parents' house (in summer! hope for sunny wheather!) to get his mini's undercoated/varnished :-D
So yeah, I can see the benifits of getting my own airbrush setup soon :-)